DIY Woven Headboard

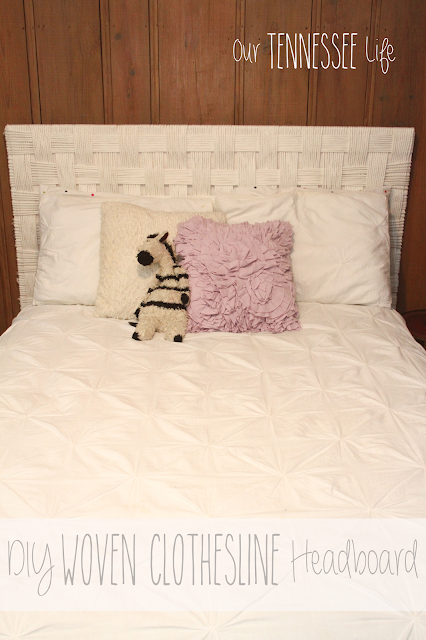
I have been loving this Seagrass Block Headboard from Pier 1, and was trying to think of a way I could DIY it to fit our daughter's space.  E is almost 4 so I wanted something softer than seagrass and also something white since our entire house is wood.  Wood walls, wood floors, wood windows.  You get it...wood.  They clothesline popped into my head.  Here is what I came up with and how I did it.  I always like to throw in a finished pic before the tutorial, so here you go.
What you need for your DIY Woven Headboard
-Clothesline (I used 6 packages/200 yds each for a full size...yes, its a lot of clothesline)
-Plywood cut to your headboard size.  Since we did this for a full size we cut ours to 60" wide and 32" tall
-small amount of paint
-2 eye bolts/hooks
-tape measure, plyers. screw driver

After we had the wood cut I painted it with white paint so the wood wouldn't stand out too much.  I then started stapling and cutting my clothesline.


I didn't want to mount our woven headboard to the bed frame.  Instead I opted to mount directly on the wall.  I used this tutorial for the exact steps.


The finished product-

If I could go back and do it again, I may try and make it a bit tighter, but all in all I'm happy.  Emmi's room is still in need of some cool art to go behind her bed and many other things, but I think our DIY Woven Headboard is the start of something good in here!  Finally!

I also thought about dyeing the clothesline, so that is always an option for those that do not want white.

Linking up to:
Nifty Thrifty Tuesday @ Coastal Charm
Make it Pretty Monday @ The Dedicated House
Tutorials & Tips Link Party
Give me the goods Monday @ Rain on a Tin Roof

Labels:

Our Tennessee Life ...formerly The Retail DIYet: DIY Woven Headboard

Sunday, September 8, 2013

DIY Woven Headboard

I have been loving this Seagrass Block Headboard from Pier 1, and was trying to think of a way I could DIY it to fit our daughter's space.  E is almost 4 so I wanted something softer than seagrass and also something white since our entire house is wood.  Wood walls, wood floors, wood windows.  You get it...wood.  They clothesline popped into my head.  Here is what I came up with and how I did it.  I always like to throw in a finished pic before the tutorial, so here you go.
What you need for your DIY Woven Headboard
-Clothesline (I used 6 packages/200 yds each for a full size...yes, its a lot of clothesline)
-Plywood cut to your headboard size.  Since we did this for a full size we cut ours to 60" wide and 32" tall
-small amount of paint
-2 eye bolts/hooks
-tape measure, plyers. screw driver

After we had the wood cut I painted it with white paint so the wood wouldn't stand out too much.  I then started stapling and cutting my clothesline.


I didn't want to mount our woven headboard to the bed frame.  Instead I opted to mount directly on the wall.  I used this tutorial for the exact steps.


The finished product-

If I could go back and do it again, I may try and make it a bit tighter, but all in all I'm happy.  Emmi's room is still in need of some cool art to go behind her bed and many other things, but I think our DIY Woven Headboard is the start of something good in here!  Finally!

I also thought about dyeing the clothesline, so that is always an option for those that do not want white.

Linking up to:
Nifty Thrifty Tuesday @ Coastal Charm
Make it Pretty Monday @ The Dedicated House
Tutorials & Tips Link Party
Give me the goods Monday @ Rain on a Tin Roof

Labels:

3 Comments:

At September 8, 2013 at 2:59 PM , Blogger Christy Nicholson said...

Amazing! Love it.

 
At September 9, 2013 at 10:25 AM , Blogger Kayla @ Home Coming said...

I love this! Gorgeous job. I'd love for you to link up to The DIY'ers! http://homecomingmn.blogspot.com/2013/09/the-diyers-28.html

 
At September 10, 2013 at 7:17 AM , Blogger Rita said...

How creative! I love it!

Rita

www.ferrytaleshome.blogspot.com


Post a Comment

Subscribe to Post Comments [Atom]

<< Home